Vue3 + Vite + TypeScript 项目实战 -----(二)Vue3 生命周期
Vue3 继承了 Vue2 的所有生命周期函数,所以 Vue2 的生命周期的应用方式同样适用于 Vue3。同时 Vue3 还新增了一些新的生命周期。
原有的生命周期函数我们这边不做过多的赘述,我们来讲解一下 Vue3 相对于 Vue2 变更了和新增了哪些生命周期函数
beforeUnmountunmounted
这两个生命周期替代了 Vue2 的 beforeDestory 和 destoryed生命周期,两者的作用是一致的,都是在组件卸载的时候调用的,在 Vue3 还可以使用 unmout API 来卸载应用
renderTracked跟踪 虚拟DOM 渲染时候调用,接收
debugger event作为参数
组件第一次渲染的时候调用,数据发生改变不会调用1
2
3
4
5
6
7
8
9
10
11
12
13
14
15
16<p>Cart: {{cart}}</p>
<script>
export default {
data() {
return {
cart: 1
}
},
// key: 渲染的属性的键名
// target: 渲染属性的键值对
// type: 对当前属性的操作
renderTracked({key, target, type}) {
}
}
</script>renderTriggered当虚拟 DOM 重新渲染为 triggered.Similarly 为renderTracked,接收 debugger event 作为参数。此事件告诉你是什么操作触发了重新渲染,以及该操作的目标对象和键
触发属性值的变更的时候触发1
2
3
4
5
6
7
8
9
10
11
12
13
14
15
16
17
18
19<p>Cart: {{cart}}</p>
<script>
export default {
data() {
return {
cart: 1
}
},
// key: 渲染的属性的键名
// target: 渲染属性的键值对,值是修改之后的值
// type: 对当前属性的操作
renderTracked({key, target, type}) {
}
mounted() {
setTimeout(() => {this.cart++}, 10000)
}
}
</script>
1 | // 创建应用 |
setup->created和beforeCreate
setup 在 创建组件之前执行,作为组合式 API 的入口点,return 的返回值可以渲染到页面上
传参
props 父组件传入的 props 对象,是响应式的,prop 发生变化时会同时发生更新
注意不能使用结构赋值,否则会失去响应式的特性,如果想要解构出
props中的属性可以选择使用toRefs来完成此操作1
2
3
4
5
6
7
8
9
10
11
12
13
14
15
16
17
18
19
20
21
22
23
24
25
26
27
28
29
30
31
32
33
34
35
36<template>
<div>
<!-- 记录 Vue3 生命周期的相关使用方法 -->
<setup-hook :time="time" other="other" :other-time="time" @success="handleSuccess">
<span> 23123</span>
<template v-slot:title> 23123</template>
<template v-slot:bottom> 23123</template>
</setup-hook>
<div>test text</div>
</div>
</template>
<script lang="ts">
import components from './components/index'
export default {
components: {
...components
},
data() {
return {
time: 1000
}
},
mounted() {
setTimeout(() => {
this.time += 1000
}, 1000)
},
methods: {
handleSuccess() {
console.log('success')
}
},
}
</script>1
2
3
4
5
6
7
8
9
10
11
12
13
14
15
16
17
18
19<div>
<div>当前时间:{{time}}</div>
<div>截取props{{newTime}}</div>
<div>toRefs(props){{refTime}}</div>
</div>
<script lang="ts">
import {toRefs} from 'vue'
export default {
setup(props) {
let {time: newTime} = props
let {time: refTime} = toRefs(props)
console.log(refTime)
return {
newTime,
refTime
}
}
}
</script>
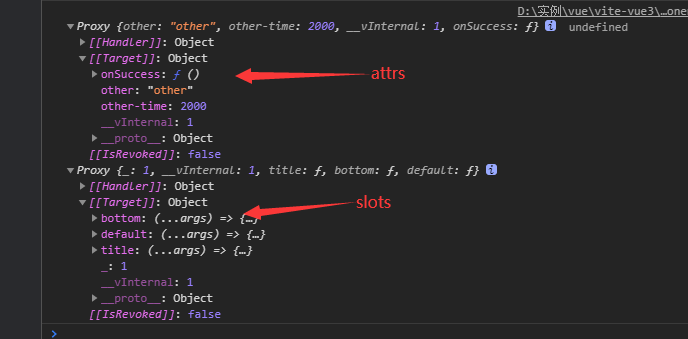
使用 toRefs 解构 props 的时候 如果想要直接访问 需要访问其 value 属性,下面是打印出来的解构出来的值,最后需要使用 return 抛出需要渲染和使用的变量及方法context 暴露了三个组件的
property(attrs,slots,emit)attrs为父组件在子组件上传递的属性(未被props接收)slots为父组件在子组件中传入的插槽 默认有一个default插槽emit这是一个执行函数,相当于Vue.$emit()可以用于发送事件context是一个普通的 JavaScript 非响应式对象,可以安全的使用 ES6 的解构赋值操作1
2
3
4
5
6
7
8
9
10
11
12
13
14
15
16
17
18
19
20<!-- 父组件 -->
<setup-hook :time="time" other="other" :other-time="time" @success="handleSuccess">
<span> 23123</span>
<template v-slot:title> 23123</template>
<template v-slot:bottom> 23123</template>
</setup-hook>
<!-- 子组件 -->
<script>
setup(props, {attrs, emit, slots}) {
let {time: newTime} = props
let {time: refTime} = toRefs(props)
console.log(refTime)
console.log(attrs, slots)
emit('success')
return {
newTime,
refTime
}
},
</script>
因此在执行 setup 的时候组件实例还未被创建,只能访问 props, attrs, slots, emit实例,无法访问 data, computed, methods
setup 在最后会有一个返回值,这个返回值是包含我们需要渲染或者在其他生命周期需要使用的变量的对象。
我们在使用 setup 需要注意以下几点:
setup中的this并不是 Vue 实例的引用,因为setup()是在解析其它组件选项之前被调用的,所以setup()内部的this的行为与其它选项中的this完全不同。这在和其它选项式 API 一起使用setup()时可能会导致混淆。如果在
setup中,我们定义了一个引用类型的变量,并针对这个变量进行了延时修改,这时修改之后的值并不会改变页面渲染,因为我们定义的并不是一个响应式类型的数据,如果想要创建一个响应式类型的数据,可以使用reactive来创建1
let obj = reactive({value: 1, label: 'object'})
如果我们定义的是一个基础类型的变量,此时也想要他实现响应式的一个变化,这是可以使用
ref来创建,访问对象的值可以通过访问变量的value属性1
2
3
4const count = ref(0)
console.log(count.value) // 0
// 此外还可以对 ref 内部进行类型指定
const count = ref<string | number>(0)setup的返回值可以在其他生命周期或者函数中直接通过this调用,并且已进行过响应式处理
在 setup 中还新增了一下几种 生命周期钩子,这些钩子函数只能在 setup 中使用
onBeforeMountonMountedonBeforeUpdateonUpdatedonBeforeUnmountonUnmountonErrorCapturedonRenderTrackedonRenderTriggered
具体使用方法与生命周期函数类似,但是注意以上这些只能在 setup 中使用
1 | setup() { |
Vue3 还提供了 provide 和 inject 方便在 setup 中进行 提供和注入
1 | setup() { |


